Course Overview
Audience: System administrators, IT staff, or power users responsible for managing access.
Format: Instructor-led, face-to-face (includes explanations, demonstrations, guided practice, and group discussions).
Duration: ~4–6 hours (can be modularised into half-day or full-day delivery).
Learning Outcomes:
Understand user types and how they function.
Assign and manage security roles, groups, and scopes effectively.
Create and administer users within the system.
Apply best practices for secure and efficient user management.
TABLE OF CONTENTS
- Course Overview
- Module 1: Introduction to User Administration
- Module 2: User Types
- User Module
- Module 3: Security Roles
- Module 4: Groups
- Module 5: Crews
- Module 6: Practice
Module 1: Introduction to User Administration
What is User Administration?
User administration is the process of managing the lifecycle of users within a system. This includes creating, modifying, and deleting user accounts, assigning roles and permissions, and ensuring users have the appropriate level of access to perform their tasks. Effective user administration ensures that the right people have the right access at the right time.
Importance of Structured User Administration
Consistency and Efficiency
A structured approach allows administrators to apply standardised rules and processes.
Reduces errors and inconsistencies in granting or removing access.
Improves efficiency in managing large numbers of users across departments or systems
Accountability and Transparency
Provides a clear audit trail of who has access to what resources.
Enables accountability by ensuring permissions are traceable to individuals or groups.
Facilitates compliance reporting and internal reviews.
User Experience
Ensures users can access the tools they need without unnecessary delays.
Reduces friction by aligning access rights with job responsibilities.
User Administration and System Security
Access Control and Least Privilege
Structured user administration enforces the principle of least privilege, ensuring users only access the resources required for their roles. This is done by creating targeted security roles and building security groups relating to job task function.
Prevents accidental or intentional misuse of sensitive information.
Protection Against Insider Threats
By monitoring and limiting permissions, organisations reduce the risks posed by internal actors.
Regular reviews of user accounts help identify dormant or unnecessary accounts that could become security vulnerabilities.
Incident Response and Risk Management
A clear framework for user administration enables quick action to suspend or revoke access in the event of suspicious activity.
Supports proactive risk management by identifying anomalies in access patterns.
Online task logging and management facilities support best practices further limiting risk and enhancing the user experience.
User Administration and Compliance
Regulatory Requirements
Many industries (e.g., finance, healthcare, government) require strict control of user access to comply with laws and standards such as GDPR, HIPAA, or ISO 27001. Although these are not relevant to our industry, certain jurisdictions such as the US and Europe have certain data retention policies that need to be adhered to.
Structured user administration provides the evidence needed for audits. Every function within the system is logged making it easy to track system usage and changes.
Audit and Reporting
A formal system of user administration makes it easier to generate compliance reports.
Demonstrates to regulators and auditors that the organisation has effective access controls in place.
Data Privacy and Protection
Ensures sensitive personal and corporate data is only accessible to authorised personnel.
Reduces the risk of data breaches, fines, and reputational damage.
Conclusion
Structured user administration is more than a technical function—it is a cornerstone of organisational security and compliance. By aligning user roles, permissions, and access controls with business needs, organisations create a safer and more efficient digital environment. Ultimately, strong user administration protects both the organisation’s assets and its people, while ensuring compliance with external regulations.
Module 2: User Types
Named Users
Users who are responsible for adding and modifying data, managing users and security, reporting, and accounting.
Able to login.
Utilises one user license.
Can be assigned roles and groups.
Can have a scope assigned.
Example use cases: Field staff, Back-office staff, Accounting staff.
Listed Users
Users who do not have access to the system, thereby cannot add any data but are listed in various user dropdown boxes.
Unable to login.
Utilises one listed user license.
Example use cases: Certain field and office staff, users who require safety observations conducted, or are field offsiders with relation to inspections.
Crews
A grouping of named and listed users.
Able to login.
Requires a minimum of one name user, who is the crew leader. (for password distribution and alerting)
Utilises one user license.
Example use cases: Where a company has staff groups where task ownership is a collective and have limited access to data entry devices. Where single sign-on is preferred for a group of users.
Benefits: Provides a sense of task ownership where multiple users add and update job task data, audit trail refers to the crew not individual users.
User Module
The User module hosts is broken up into 4 sections:
- Users
- Roles
- Groups
- Crews

Named Users
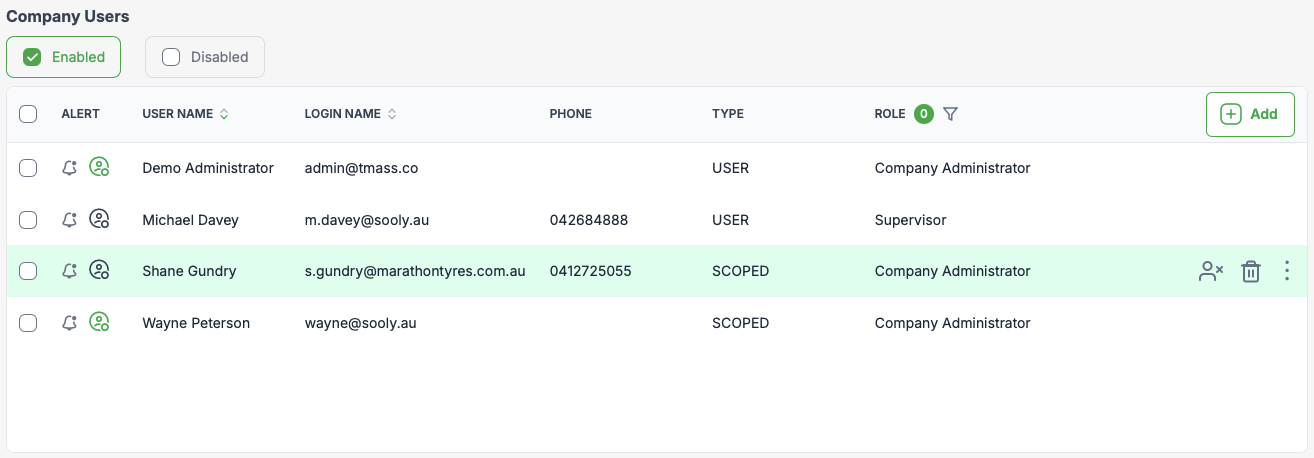
The users section is where the Company / named users are created and listed. Each user displays a basic set of attributes, such as their user name, login name, phone, their type and associated role. Additionally, when hovering over a user a context menu will be displayed allowing the following functions
User context menu items:
- Copy - Allows an administrator to copy a users security and company/site settings. This facilitates a quick and easy method to create new users based on existing users who may have complex security needs or have access to multiple companies and sites.
- Disable - Prevents the user from logging in.
- Edit - Edit a users general settings, security and site access.
- Reset password - Reset a users password.
- Delete user - Deletes a user and their data from the system. NOTE: Where a user is listed in a safety observation, inspection and audit logs , their full name will be retained for legal purposes.

Scoped user
A scoped user is a user that is not a part of the selected company. They are a user that has been given access to the company by a system administrator. This user doesn't utilise a named user license in the scoped company. Hovering over a scoped user a context menu will be displayed allowing the following functions:
Scope user content menu items.
- Disable user - Prevents the user from logging in.
- Delete user - Deletes the scoped user from company and site access. This doesn't delete the actual user account. NOTE: Where a user is listed in a safety observation, inspection and audit logs , their full name will be retained for legal purposes.
Listed users
Listed users as discussed previously are users who are listed in various user list boxes throughout the system such as in safety observations or inspections. List users utilise a single listed user license. Hovering over a listed user a context menu will be displayed allowing the following functions:
Listed user content menu items.
- Edit - Prevents the user from logging in.
- Delete user - Deletes the listed user account from the system. NOTE: Where a user is listed in a safety observation, inspection and audit logs , their full name will be retained for legal purposes.

View user details
The User Details Page is where administrators can access individual user information, review account activity, and perform key account management functions. Effective use of this page helps maintain security, streamline account administration, and support user management across the system.
Viewing a users details can be achieved by hovering the mouse over the required user, highlighting it green and left clicking.

Viewing User Information
On the left side of the page, administrators can view key details about the user, including:
Full Name and Login Name: (e.g., Michael Davey, m.davey@sooly.au).
Contact details (phone number).
Default company and site: the user is attached to.
Role(s), group(s), and crew(s) assignments.
Account status (e.g., Active/Disabled).
Last login time for auditing purposes.
Company access (which environments or companies the account can access).
This section provides a complete profile for validation, troubleshooting, or account verification.

Reviewing User Activity
The Activity Panel (right side of the page) shows a chronological log of user-related actions. For example:
User creation events (e.g., adding new users to the system).
Changes to account details or access.
Administrative actions affecting the account.
Function related actions such as adding or modifying assets.
Administrators can filter activity by year and month to narrow down logs for auditing, compliance, or security checks.

Account Actions Available
At the top of the User Details Page are key action buttons. These allow administrators to directly manage the account:

Print – Generate a record of the user’s details and activity log for compliance or reporting.
Logout – Force a logout from all active sessions, useful in case of security breaches, misuse or troubleshooting.
Reset Password – Quickly issue a new password if the user is locked out or security requires credentials to be updated.
Copy Account – Create a new user account using the existing account as a template (saves time when onboarding staff with similar roles).
Edit – Update user information, including contact details, roles, groups, or crew allocations.
Disable Account – Temporarily suspend access without fully deleting the account (best practice for extended leave or role changes).
Delete Account – Permanently remove the user from the system (should be used cautiously, as this action cannot be undone). NOTE: Where a user is listed in a safety observation, inspection and audit logs , their full name will be retained for legal purposes.
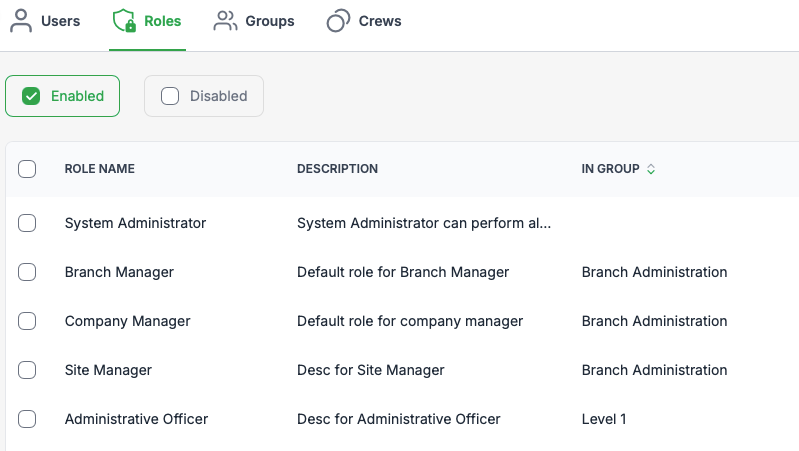
Module 3: Security Roles
Roles are a set of permissions and access rights controlling what users can see and do. They are the foundation of user security within TMaSS, and when used effectively can support the organisations security outcomes and limit the attack surface.
TMaSS utilises the Principle of Least Privilege (PoLP). This is a foundational security concept that dictates users, systems, and applications should be granted only the minimum access necessary to perform their assigned tasks. This minimises the risk of unauthorised access, data breaches, and misuse of sensitive resources.
Role-Based Access Control (RBAC): Roles are defined with specific permissions, and users are assigned roles based on their job functions. For example, a user with two roles—one allowing asset deletion and one that doesn’t—would be restricted from deleting assets if the least privilege principle is enforced.
So why does PoLP matter?
- Reduces attack surface by limiting what users and systems can access.
- Prevents privilege creep, where users accumulate unnecessary permissions over time.
- Improves compliance with standards like ISO 27001 and NIST 800-53
- Supports Zero Trust by assuming no user or device is inherently trustworthy and re-authenticating access regularly.

Role Actions Available
When hovering over, and highlighting a role a set of three contextual actions will be available. Additionally, when viewing the role details there is an extended list of actions.
Contextual actions:

- Copy role – Create a role using the existing role as a template (saves time when creating roles with similar security functions).
- Edit – Update role information and security allocations.
- Delete role – Permanently remove the role from the system. NOTE: Roles that are assigned to users, crews and groups cannot be deleted.
Detail actions:

- Remove user from role – Remove a user from role.
- Add user to role – Add a user to the role.
- Disable role - Disable the role. Will not be available to add to a user, crew or group
- Edit – Update role in
- Copy role – Create a role using the existing role as a template (saves time when creating roles with similar security functions).
- Edit – Update role information and security allocations.
- Delete Account – Permanently remove the role from the system. NOTE: Roles that are assigned to users, crews and groups cannot be deleted.
- Close - Close the role details page.
Role details
The Role Details Screen is used to manage, review, and audit the permissions and responsibilities assigned to a role within the system. It ensures administrators can control access effectively, assign users, crews or groups to roles, and maintain compliance through activity logging.

Key Components of the Role Details Screen
1. Role Type
Displays the type of role being managed (e.g., Company role).
The role type determines the scope of access (company-wide, site-specific, or module-specific). NOTE: Currently, only company role types are supported.
Role Inclusions
A list of modules or features that the role can access.
Safety
Company
Assets
Rubber Liner (Marathon Tyres only)
Users
Help
Library
Reports
Each module shows whether access is enabled or disabled, providing clarity on permissions at a glance.
Expanding a section (e.g Assets) will display detailed permissions, such as the ability to create, edit, or delete assets.

Assigned Users & Groups
Lists all users and groups currently assigned to this role. The filter allows you to quickly list users or groups.
Each entry includes:
Status (if a user is active or Inactive)
User / Crew Full Name
User / Crew Login Name (for users)
Type (User or Group)
This section allows administrators to confirm who has been granted permissions via this role.
The search bar provides quick filtering when working with large teams.

Activity List (Audit Log)
Provides a chronological log of actions taken on the role.
Examples include:
Editing role permissions.
Enabling or disabling specific access rights.
Adding/removing users / crews or groups.
Each log entry records:
The action taken
A description of the action (e.g: “disabled Create RL specification revision”).
Date and time of the change.
User who made the change.
The IP address the change was made from.
The browser used to make the change.
This ensures transparency and accountability, supporting compliance with governance or audit requirements.

Best Practices for Administrators
Regular Reviews: Check assigned users and groups periodically to ensure access is appropriate.
Audit Monitoring: Use the activity log to verify changes and investigate any security or compliance concerns.
Granular Permissions: Enable only the permissions necessary for the role, reducing the risk of over-access.
Separation of Duties: Assign different roles for critical functions to strengthen internal security controls.
Module 4: Groups
The Groups Submodule is used to manage collections of security roles. Groups allow administrators to bundle multiple security permissions together and apply them consistently across users. This reduces administrative effort, ensures standardisation, and strengthens system security.
By the end of this course, participants will be able to:
Understand what Groups are and why they are used.
Navigate the Groups Submodule.
Create, copy, edit, and delete groups.
Assign roles and users to groups effectively.

What Are Groups?
A Group is a collection of Roles. Instead of assigning multiple roles to each user individually, administrators can assign users to a group that already contains the required roles. This is particularly useful for teams or job functions where multiple people require the same access.
The Groups Submodule screen provides:
Group Name – The label identifying the group.
Description – A summary of what access or functions the group covers.
In Roles – The number of security roles linked to the group.
In Users – The number of users currently assigned to the group.
A Search Bar is available to quickly locate groups when working with larger organisations.
Group Actions Available
When hovering over and highlighting a group a set of three contextual actions will be available. Additionally, when viewing the group details there is an extended list of actions.
Contextual actions:
- Copy group – Create a group using the existing group as a template (saves time when creating groups with similar security functions).
- Edit – Update group information and security allocations.
- Delete group – Permanently remove the role from the system. NOTE: Groups that are assigned to users, crews or roles cannot be deleted.
Detail actions:

- Add user - Assign the group to a user.
- Remove user - remove an assigned user from the group.
- Add role - Add a new role to the group.
- Remove role - Remove a role assignment from the group.
- Edit – Update group information and security allocations.
- Delete group – Permanently remove the role from the system. NOTE: Groups that are assigned to users, crews or roles cannot be deleted.
Group Details
The Group Details Page provides a complete view of:
- The group’s description - Provides a summary of what the group is used for.
- The users assigned to the group - Displays a list of users who are currently members of the group with their status, full name and login name.
- The assigned roles included in the group - Lists all roles included in the group and the pie graph showing an overview of each module with their assigned permissions.
- The activity history (audit log) - Shows recent changes made to the group including the action performed and its description, who made the change, the date and time of the action, the IP address and browser from where the action was made.

Module 5: Crews
The Crews Submodule allows administrators to manage groups of users who work together as a team but share a single login account. Unlike individual user accounts, crews are designed for operational contexts where one device is shared among multiple users, ensuring simplicity and accuracy in data capture.
Crews help to:
Streamline device access: A single login for a team using one device.
Promote data ownership: Actions are attributed to the crew rather than just one member, ensuring fairness and accountability.
Simplify audit trails: Logs clearly identify which crew performed an action, rather than defaulting to one person.
Maintain license efficiency: Crews use one user license even though multiple people are part of the group.

What Are Crews?
A crew is a collection of individual users where the crew is assigned a shared login name and password. When the crew account is used, all actions are attributed to the whole crew, not just the person physically entering the data.
This is particularly useful in environments such as:
Workshops or maintenance bays where one terminal is used by a rotating team.
Fieldwork where a tablet or shared device is used to record activities.
Shift-based teams where multiple workers contribute to the same set of tasks.
Key Features of Crews
Shared Login
Each crew has its own login credentials.
Only one device/session needs to be managed.
Data Ownership
The crew is collectively responsible for entries and updates.
This avoids confusion when only one person is entering information on behalf of others.
Audit Log Integration
Activities appear in the audit trail under the crew name, rather than an individual user.
This provides clearer visibility of which team was responsible for an action.
Security Privileges
Crews are treated as an extension of users.
They are assigned roles and privileges in the same way as individual users.
This ensures crews only have access to the areas and data they require.
License Usage
A crew uses a single user license, making them cost-effective.
This avoids consuming multiple licenses for team-based access.
Crew Actions Available
When hovering over and highlighting a crew a set of four contextual actions will be available. Additionally, when viewing the crew details there is an extended list of actions available.
Contextual actions:

- Disable crew – Disables the crew and disallows login privileges.
- Edit – Update crew information and user / security allocations.
- Delete crew – Permanently remove the role from the system. NOTE: Deleting a crew will delete the crew only, not any users assigned to the crew.
Detail actions:

- Print – Prints the current months activity / audit trail
- Logout – Logs out the crew for current session.
- Reset password – Reset the crews password.
- Edit - Edit the crews details including its name and description, the assigned roles, groups and users, and assign company and sites.
- Disable crew – Disables the crew and disallows login privileges.
- Delete crew – Permanently remove the role from the system. NOTE: Deleting a crew will delete the crew only, not any users assigned to the crew.
- Exit - Exits from the crews detail page.
Crew details page

Best Practices
Use clear crew names (e.g., Night Shift Crew 1, Maintenance Team A).
Keep crew membership up to date so audit logs remain accurate.
Assign only necessary privileges to minimise risk.
Review audit logs regularly to verify that crew usage aligns with operational expectations.
Module 6: Practice
At the end this module you will be able to complete the following:
- Create and edit:
- Users
- Roles
- Groups
- Crews
Follow the below links to complete each action.
Create users
https://help.tmass.com.au/a/solutions/articles/33000293955
Create roles
https://help.tmass.com.au/a/solutions/articles/33000294156
Create groups
https://help.tmass.com.au/a/solutions/articles/33000296095
Create Crews
https://help.tmass.com.au/a/solutions/articles/33000294155
Was this article helpful?
That’s Great!
Thank you for your feedback
Sorry! We couldn't be helpful
Thank you for your feedback
Feedback sent
We appreciate your effort and will try to fix the article